March 06, 2024

Maximizing Muscle While Burning Fat: Try the Lean Gains Method

a strong man in the power rack for deadlift

 Losing weight without sacrificing muscle is a fitness goal many strive for but often find challenging to achieve.

The key lies in a balanced approach that combines effective workout routines, precise nutrition, and the right equipment. If you're looking for a method to burn fat and retain muscle, we're big believers in r/LeanGains.
Certainly not the only method but a tried and tested one, in this blog we'll dive into the LeanGains method—a powerful duo that can help you achieve your body recomposition goals.
paper with the word FAT burning in a fire
We love this explainer from qualified nutritionist Jamie Wright, who explains the phenomenon succinctly:

The LeanGains Method: A Brief History

Developed by Martin Berkhan, LeanGains is a fitness and nutrition protocol designed to optimize fat loss while preserving muscle mass. It combines intermittent fasting, strength training, and macronutrient management to create an environment conducive to fat loss and muscle gain. This method has gained popularity for its practical approach and tangible results.
Just how popular? Check out the subreddit - over 250,000 members and growing!

Executing LeanGains: Fasting, Lifting, Feeding

LeanGains typically revolves around a 16/8 intermittent fasting schedule—fast for 16 hours and eat during an 8-hour window.
This pattern is believed (we aren't experts), to promote fat oxidation and improve metabolic efficiency. Strength training, particularly heavy lifting, forms the core of the workout regimen. By focusing on compound movements like squats, deadlifts, and bench presses, you stimulate muscle maintenance and growth even in a caloric deficit.
As home gym heads ourselves, we here at Major Fitness are big fans of this - as we build our highly durable power racks and Smith machines for our users to better get their heavy lifting in! More on that later, though.

Nutrition: Fuelling Your Journey

Proper nutrition is crucial in the LeanGains approach. On training days, prioritize carbohydrates to fuel workouts and aid recovery, while focusing on fats and proteins on rest days to support muscle synthesis and fat loss. High-quality protein is a staple in every meal to ensure muscle preservation.
Are you getting enough protein intake? We're big fans of protein supplementation and will cover this more in a future blog.

Major Fitness Gear: Get Equipped for Lean Gains

To effectively implement LeanGains, having the right equipment is essential. If you're a regular gym attendee, no worries - but we'll take the time to highlight some of our best-selling racks and Smith machines for those in the home gym space.
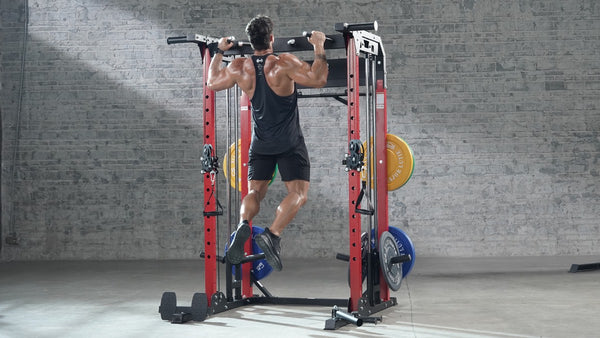
If you're looking for a home gym upgrade, we recommend checking out our leading Raptor F22 All-in-One Power Rack, for a truly do-it-all solution. It's a beefy power rack that offers extendability, with the ability to add racks, barbells, and plates all in one set. Over 80 different exercises in one machine? Yep, we're not lying!

man pulling up with power rack raptor f22

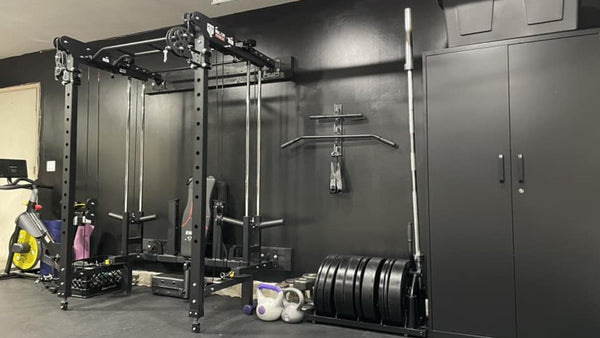
If you need something compact and budget-friendly, we also love our Lightning F35 Rack, a foldable solution that's friendlier to those limited in space.

lightning f35 power rack home gym set up

We don't just do these either! Major Fitness is a leading producer of high-value gym equipment. Weight plates, dumbbells, holders... You name it! Check out our full range here.

Creating Your Routine

An effective LeanGains routine should include 3 to 4 days of strength training, focusing on major compound movements. Use Major Fitness equipment to perform exercises like squats, deadlifts, and presses. Supplement your routine with accessory movements using the multifunctional handlebar for targeted muscle work.
We love using apps to track our progress, and Strong Lifts is a community favorite. Highly recommended for keeping consistent!

Hitting the Gym

Consistency is key with LeanGains. If you're new to it, we highly recommend doing your research and spending some time around the subreddit to familiarize yourself with it and the community behind it.
We wish you luck in your weight loss ventures (and muscle building) - all for a stronger tomorrow!


Customers Also Bought

Shop Now

Major Fitness Adjustable Bench | 1300Lbs Capacity Weight Bench PLT01

$219.99 $259.99
Shop Now

Major Fitness Rack Mounted Leg Extension

$389.99
Shop Now

Major Fitness Weight Stack Pin Extender

From $129.99

You may also like

View All >
Seated Cable Row: Proper Form, Muscles Worked, Variations & Alternatives
May 27, 2026

Seated Cable Row: Proper Form, Muscles Worked, Variations & Alternatives

Ask any experienced lifter what one back exercise they'd never give up. The seated cable row comes up more than almost anything else. It's not a glamorous answer. There are no viral videos of someone hitting a cable row PR. No one's building a following around it. But that's kind of the point — this exercise doesn't need the attention, because the results speak for themselves. The thing is, most people either skip it or do it badly. They pile on weight, swing their torso, cut the range of motion in half — and then wonder why their back isn't responding despite all the hours they're putting in. This guide fixes that. Here's everything on muscles worked, proper form, grip variations, and the best alternatives when a cable machine isn't available. What Is the Seated Cable Row? The seated cable row (also called the cable seated row) is a horizontal pulling exercise performed on a low-pulley cable machine. You sit on a weight bench or platform, plant your feet on the foot pads, and pull a handle attachment toward your lower abdomen while keeping your torso mostly upright. Unlike a dumbbell or barbell row, the cable doesn't let up. With free weights, resistance fades as the bar gets closer to your body — the hardest part is off the floor, and the contraction at the top is almost a rest. A cable doesn't work that way. The tension stays constant from start to finish, which means the muscles are actually loaded through the full range of motion, not just the beginning of it. There's also a lot less spinal demand than people expect. Because you're sitting upright instead of hinging forward, the lower back isn't fighting to hold your torso in position for every rep. That's part of why this exercise tends to stay in programs long-term — it's hard enough to build muscle, easy enough on the joints to train consistently. Most commercial gyms have a dedicated seated row station with built-in foot pegs and a low pulley. If you're training at home, you can also set one up using an all-in-one home gym Smith Machine or power rack with cable pulley system — the movement is the same. Seated Cable Row Muscles Worked Pull the handle back and a lot of things fire at once. Here's what's actually happening. The lats do most of the work. These are the large muscles that run down both sides of your back — the ones responsible for that V-shape when they're developed. Every rep starts with them, and when the form is right, you'll feel them loaded from the first inch of the pull. As the handle comes in closer, the rhomboids and mid trapezius take over the finish. Their job is to draw the shoulder blades together — that squeeze at the end of each rep that most people either rush through or skip entirely. Don't. That's where the upper back stimulus actually lives. The rear deltoids and teres muscles assist throughout, helping with shoulder extension and keeping everything tracking properly. They're not the stars of the show, but they're doing real work. On the secondary side, the biceps are involved in bending the elbow through the pull. They'll always contribute — that's just how the movement works — but they shouldn't be the ones leading it. If the arms are burning more than the back, something needs adjusting. The core works quietly the whole time, holding the torso upright and keeping the lower back out of the equation. One thing worth knowing before you pick up a handle: grip width changes which muscles take the lead. Close grip puts more load through the lats and biceps. Wide grip overhand shifts the emphasis up to the rhomboids, traps, and rear delts. It's a bigger difference than most people expect — and it's worth understanding before you default to whatever attachment is already on the machine. How To Do the Seated Cable Row with Proper Form The mechanics here aren't complicated — but a few details separate a rep that builds your back from one that just tires out your arms and lower back. Go through each step before adding weight. 1. Set up the cable machine Start with a V-bar on the low pulley. Palms facing each other, neutral grip — easier on the wrists than a straight bar and a solid default for most people until you have a reason to try something different. Sit down, feet flat on the pads, knees slightly bent. Not a deep squat bend, not locked out straight — somewhere in between, where you feel like you have a base under you. Planted, not braced. If you're training on something like the Major Fitness B52 Evo, this is also where the setup becomes noticeably different from a fixed commercial machine. The Flex Arms adjust across five horizontal and four vertical positions, so the cable angle can be dialed in to match your exact torso position and arm length — rather than sitting wherever the machine forces you to sit. Small adjustment, real difference in how the lats load from the start of the pull. 2. Find your starting position Grab the handle and sit up. Chest up, shoulders back and down, spine neutral. Maybe a slight forward lean — five degrees, maybe — but honestly closer to upright than most people expect when they picture this exercise. The reason to sort this out before the set starts rather than during it: once you're a few reps in and the weight gets heavy, the body wants to round forward and start using momentum. Most people do it once on set one and then forget about it entirely. Worth making it a ritual — same check every set, not just when you're fresh. 3. Lead with your elbows, not your hands This is the one that takes the longest to actually feel right. Stop thinking about pulling the handle. Think about driving your elbows back and behind your torso — past the ribcage if you can get there. When the hands lead, the biceps take over, and the back barely registers the rep. The weight still moves, the set still ends, and you walk away thinking you trained your back when you mostly just did a slow bicep exercise. Easy way to check: which is more tired after the set — your arms or your back? If it's the arms, the elbows weren't leading. 4. Pull to your lower abdomen Lower than most people naturally aim. Not the sternum, not the chest — the belly button. At the end of the pull, your elbows should be behind you — not level with your sides, actually past them — and you should feel the shoulder blades meeting in the middle. Then pause. A real one. Not a blur, not the split second before you let it go — an actual held position. That's the moment the upper back is doing its most useful work, and almost everyone skips it when the weight gets heavy because holding it there is uncomfortable, and slowing down feels counterproductive. It isn't. That pause is the rep. 5. Control the return Three seconds on the return. Let the cable pull your arms forward with some resistance behind it, and as your arms extend, let the shoulder blades spread apart. A lot of people try to keep them squeezed together on the way back, but the protraction at the end isn't a mistake — it's the full range of motion. That stretch at the bottom is what loads the lats before the next pull. Cut it short, and the next rep starts from a worse position. Last thing: if the weight stack is dropping or clanging on every return, the load is too heavy. That's not a push-through-it situation — it just means the eccentric is gone and you're doing half a rep on repeat. Drop the weight, slow it down, and actually do the exercise. Seated Cable Row Variations Changing the handle attachment or grip width changes everything. Here's what you need to know about the most common variations: Variation Muscles worked Best for Close grip (V-bar) Lats, biceps, teres major Building lat width and thickness; most popular starting point for beginners Wide grip (overhand bar) Rhomboids, traps, rear delts Upper back thickness and posture improvement; pulling to upper belly or lower chest Underhand grip (supinated bar) Lats, biceps (more than close grip) Maximizing bicep involvement and lat stretch Rope attachment Rear delts, rhomboids End-range contraction and scapular retraction; great for mind-muscle connection Single-arm cable row Lats, core (anti-rotation) Fixing left-right imbalances; core stability work Best Seated Cable Row Alternatives No cable machine? No problem. The horizontal rowing pattern is one of the most replicable movements in training — you can get the same stimulus with barbells, dumbbells, bands, or your own bodyweight. Here are the best options, and what actually makes each one worth doing. Exercise Muscles Why Do It Watch Out Barbell Bent-Over Row Lats, traps, rhomboids, rear delts Best for loading heavy and adding back thickness Hard on the lower back — brace tight Single-Arm Dumbbell Row Lats, teres major, biceps Bench support removes lower-back stress; great range of motion Pause at the bottom — don't rush the stretch Inverted Row Lats, rhomboids, traps, core Zero equipment, scales to any level Bend knees to go easier, elevate feet to go harder Resistance Band Seated Row Lats, rhomboids, rear delts Closest thing to cable tension without the machine Resistance fades slightly at the top Incline Dumbbell Row Lats, rear delts, biceps Chest support kills momentum — all back, no cheating Go lighter than you think the first time T-Bar Row Lats, rhomboids, traps Stable, loadable, good middle ground between dumbbells and cables Use the chest-supported version to protect the lower back How to Program the Seated Cable Row Where does this exercise fit in your training week? The seated cable row works well as either a primary or secondary back movement, depending on your goals and what else you're training. For most people training 3–5 days a week, the seated cable row fits naturally into a pull day or an upper-body day. If you're doing a full-body split, one or two sets as an accessory movement after your main compound lifts works well. A common pairing you'll see in evidence-based programs: lat pulldowns and seated cable rows back-to-back. One is vertical pulling, one is horizontal — together they cover almost all of the major back muscles without overlap. Hard to beat that combination. Goal Sets Reps Rest Notes Strength 4–5 4–6 2–3 min Heavy but controlled — form breaks down before the weight goes up Muscle building 3–4 8–12 60–90 sec Slow the return, pause at the top, leave 1–2 reps in the tank Endurance / toning 2–3 15–20 45–60 sec Lighter load, focus on squeeze and feel Beginner 3 10–12 90 sec Get the feel before the weight — form first, always If you're new to this movement, start lighter than feels necessary. The natural instinct is to grab something challenging — but when the weight is too heavy, the torso swings, the arms take over, and the back barely works. Find a weight where the return takes three full seconds, and the back still feels loaded at the end of the set. Start there. Add weight when that genuinely stops being enough, not before. Once the movement feels solid, there's more room to progress than most people use. A two-second pause at the top — shoulder blades together, elbows behind the body — makes a familiar weight feel completely different. Slowing the return to four seconds does the same. Neither requires touching the weight selector, but both change what the muscles actually experience. A drop set on the last working set is worth trying occasionally too. And switching grip every few weeks — close neutral for a block, wide overhand for the next — keeps the upper and mid back developing evenly instead of one side quietly lagging behind. Frequently Asked Questions 1. Should you lean back on seated cable rows? A little — but probably less than you're doing. Some people treat this like a rowing machine at the gym and get the whole torso involved. That's not the goal. A slight natural lean at the start is fine, but if your lower back is doing work on every rep, the weight is too heavy or the form has drifted. The torso stays mostly quiet. The arms and shoulder blades do the moving. 2. Is a seated cable row worth it? It's one of those exercises that doesn't look like much but keeps showing up in serious programs for good reason. The cable maintains tension through the whole range of motion — including the stretch at the bottom — which is something a barbell or dumbbell just doesn't do the same way. That constant tension adds up over time. It's not exciting, but it delivers. 3. Is seated row better than the lat pulldown? Different exercises. The lat pulldown pulls vertically and emphasizes the lats through an overhead range. The seated row pulls horizontally and does more for the mid-back, rhomboids, and traps. Asking which one is better is a bit like asking whether you need to train your chest or your shoulders — the answer is both, for different reasons. If you can only pick one, figure out where your back is actually lagging and go from there. 4. What are common mistakes in seated cable rows? Using too much weight is the root cause of most of them. When the load is too heavy, people start swinging their torso, letting the arms lead instead of the elbows, and rushing through the return. The other one worth mentioning: not pausing at the top. Most people let the weight pull them straight back into the next rep without ever holding the contraction. That pause is where a lot of the upper back work actually happens. 5. Can seated rows build a bigger back? Yes, but the exercise is just the vehicle — volume, consistency, and progressive overload are what actually move the needle. Seated cable rows are well set up for hypertrophy because of the controlled eccentric and constant tension. Work in the 8–12 rep range, slow down the return, and add weight gradually when the form is solid. Do that over months, not weeks, and the back grows. 6. What weight should I be for the seated cable row? Less than you want to start with, almost certainly. If you're just starting out, somewhere around 20–30 lbs is where most people should begin. It's going to feel light. That's fine — the form on this one takes a few sessions to actually feel right, and you won't be able to tell if your back is working if you're fighting the weight the whole time. Final Thoughts The lifters who get the most out of this exercise are rarely the ones lifting the heaviest. They're the ones who took the time to actually feel it working — and then kept showing up. Start light. Get the form before the weight. Spend a few weeks with close-grip cable row, then try wide-grip overhand and notice what shifts. Those aren't just variations for variety's sake — each one develops a different part of the back, and rotating between them over time fills in gaps that any single grip leaves behind. At Major Fitness, our cable machines are built with that kind of training in mind — adjustable cable angles, independent dual stacks, and the flexibility to grow with the lifter rather than limit them. The details of setup matter more than most people expect, and the right home gym equipment makes sure nothing gets in the way of the work. Do the work, be patient with the numbers. Back development from this movement tends to sneak up on you — and when it shows, it's been building longer than it looks. References 1. International Journal of Strength and Conditioning – Effect of Different Grip Position and Shoulder-Abduction Angle on Muscle Strength and Activation During the Seated Cable Row: EMG study using high-density surface electromyography on 14 resistance-trained men — found that narrow grip produced significantly greater latissimus dorsi activation, while wide grip elicited higher excitation of the upper, middle, and lower trapezius, lateral deltoid, and rear deltoids. Directly supports the close grip vs wide grip recommendations in this guide. 2. PubMed – Mind-Muscle Connection: Limited Effect of Verbal Instructions on Muscle Activity in a Seated Row Exercise: A study examining the effect of verbal cueing on muscle activation during seated row — found that focused instruction increased latissimus dorsi activation by 15.21% in early repetitions while reducing posterior deltoid compensation. Supports the "elbows back" cue and the importance of intention over just moving weight. 3. ResearchGate – The Effect of Performing Bi- and Unilateral Row Exercises on Core Muscle Activation: Compared core muscle activation across free-weight, cable, and machine rows performed unilaterally and bilaterally — found that unilateral cable rows produced significantly higher external oblique activation than bilateral variations. Supports the single-arm cable row as a core stability tool beyond just a back exercise. 4. PubMed – Assessing the Feasibility of EMG Biofeedback to Reduce Upper Trapezius Excitation During a Seated Row Exercise: A study investigating upper trap overactivation during wide-grip seated rows — found that conscious feedback reduced upper trapezius excitation by approximately 10%. Supports the common mistake of shoulder shrugging and why keeping shoulders down matters throughout the movement.
12 Best Dumbbell Back Exercises You Can Do at Home
May 22, 2026

12 Best Dumbbell Back Exercises You Can Do at Home

Most people who train at home skip back day. Not because they're lazy — it just looks like you need a whole rack of machines to do it properly. A cable machine, a lat pulldown, and a seated row station. It looks complicated from the outside. It's not. A pair of dumbbells does the job — and does it well. This guide walks through the 12 best dumbbell back exercises, how to put them into a workout plan for your home gym, and what to focus on so you're actually making progress session to session. Why Build Your Back with Dumbbells? Back problems rarely show up all at once. It's usually a slow build — shoulders that gradually round forward, a dull ache after sitting too long, a twinge from picking something up the wrong way. By the time it's noticeable, the weakness has been there for a while. The good news is it doesn't take much to turn that around. Dumbbells hit your lats, traps, rhomboids, and erector spinae through a real range of motion, and because each arm works independently, your stronger side can't just take over and mask what the weaker one isn't doing. They're also just practical. A pair tucks into a corner without taking over the room. As you get stronger, you move up a weight — no new machine, no upgrade, no extra footprint. And because they're always there, the barrier to actually training drops to almost nothing. No commute, no waiting for equipment to free up, no talking yourself into leaving the house. That consistency is what actually builds a strong back — not expensive equipment. Dumbbells give you both the tools and the reason to show up. 12 Best Dumbbell Back Exercises 1. Bent-Over Dumbbell Row Your lats, rhomboids, mid-traps, rear delts, biceps — this one exercise hits all of them. Hard to beat as a starting point. Hinge forward until your chest is roughly facing the floor, dumbbells hanging straight down. Think "bow," not "squat." Drive both elbows back and up toward your lower ribs, really pinch the shoulder blades at the top — hold it for a beat before you lower. And lower slowly, don't just drop them. Lower back rounding is what gets people in trouble here, especially once the weight starts climbing. The second your spine starts to curl, you've shifted the load somewhere it doesn't belong. Drop the weight before that happens. 2. Single-Arm Dumbbell Row Training one side at a time does something the two-arm row can't — you can really feel which muscles are actually pulling, and it's harder to compensate with the wrong ones. Set yourself up with one hand on a weight bench, body angled forward, dumbbell hanging from the other arm. From there it's pretty straightforward — pull the elbow back toward your hip, let it come all the way back down, then go again. Don't rush the bottom half, that's where a lot of people shortchange themselves. The thing that trips people up here is rotating through the torso to get the weight up. Hips and shoulders stay square — if your whole body is twisting into the rep, your back isn't doing the work anymore. 3. Dumbbell Romanian Deadlift Everything on the back side of your body — hamstrings, glutes, lower back, upper back — gets worked here. And unlike a lot of gym movements, this one actually carries over to real life in a pretty direct way. Dumbbells start in front of your thighs. From there, push your hips back — not down — and let the weights travel along your legs toward the floor. You're looking for that pull through the hamstrings, which usually shows up around shin height. Once you've got it, drive the hips forward to stand back up and squeeze the glutes at the top. Knees bending too much is the most common thing to fix. This isn't a squat — the knees stay soft but pretty much stay put. All the movement is in the hips, going back and forward. 4. Dumbbell Reverse Fly Most people never train their rear delts until something starts hurting. Spend enough time at a desk or on your phone, and those muscles just switch off — and when they go, your posture goes with them. Lean forward from the hips, let the dumbbells hang, palms in. Keep a soft bend in your elbows throughout — from there, open your arms out to the sides until you hit shoulder height. Squeeze at the top, then lower slowly. The lowering part matters more than most people think. Weight selection trips people up here more than the movement itself. It's a small muscle group doing precise work, and most people grab something way too heavy and just fling it around. Pick something lighter than feels necessary and actually control it. 5. Dumbbell Deadlift The dumbbell deadlift asks more from your body all at once than just about anything else on this list — your legs, your back from top to bottom, your core holding everything together. Dumbbells on the floor outside your feet. Hinge down, grip them, get your back flat, and chest up before anything moves. Then drive through the floor — legs push first, not your lower back pulling. Keep the dumbbells close to your legs on the way up. Stand tall at the top, then reverse it under control. Some people tend to jerk the first rep off the floor, especially when the weight gets heavy. That sudden load all hits your lower back at once, which is exactly where you don't want it. Reset between reps if you have to — a clean pull from a dead stop beats a sloppy one every time. 6. Dumbbell Shrug Simple movement, but the upper traps do more than people give them credit for — neck support, shoulder stability, that thickness across the top of your back that makes everything else look more built. Arms hanging, dumbbells at your sides. Shrug straight up — and actually pause at the top instead of just bouncing through. Most people rush this part, which means the trap never fully contracts. A genuine one-second hold changes the exercise completely. Then take your time on the way down, slower than you went up. One thing worth mentioning — don't roll your shoulders into it. A lot of people do this out of habit and it doesn't add anything to the exercise; it just puts unnecessary stress on the joint. Straight up, straight down, every rep. 7. Chest-Supported Dumbbell Row With most rows, there's always a way to cheat — a little hip drive here, a torso swing there. The chest-supported dumbbell row takes all of that away. Your chest is pinned to the bench, so whatever weight moves, your back moved it. Set the bench to about 30–45 degrees, lie face down with your chest on the pad, and let the dumbbells hang straight down. Row both up toward your lower ribs, elbows going back and slightly out. Full squeeze at the top, then lower all the way — don't cut the bottom short or you're leaving half the rep on the table. Having a weight bench here makes a real difference — it gives you the angle and stability to actually get a full range of motion, which is what separates this from every other row variation on the list. 8. Dumbbell Renegade Row With every other exercise on this list, something's got your back — a bench, a chair, your own stance. Here you're in a plank the whole time, and your core has to hold everything steady while your back does the pulling. Dumbbells under your hands, push-up position, feet wide. Row one side up, bring it down, switch. Simple enough in theory — what actually gets people is the hips. The moment one arm leaves the floor, they want to rotate. Don't let them. If your hips are rocking side to side, your feet aren't wide enough or the weight is too heavy. Get the form right before adding load — a shaky renegade row is just a plank with bad posture. 9. Dumbbell Pullover Most row variations pull from in front of you or below you. The pullover is different — it stretches the lats overhead, which is a range of motion you just don't get from rows. For home gym setups, it covers ground that a cable machine or pull-up bar normally would. Flat on the bench, both hands on one dumbbell, held above your chest. Elbows stay slightly bent the whole time — from there, arc the weight back over your head until you hit that deep stretch in the lats, then bring it back. Think of it as a shoulder movement, not an arm movement. If your elbows are collapsing on the way down, the weight is too heavy, or you're letting your arms do the work. Keep that elbow angle consistent throughout — the second it changes, you've turned a lat exercise into a tricep exercise. 10. Incline Dumbbell Row The chest-supported row you did earlier works the mid-back hard. This one just changes the angle — steeper incline, chin above the pad — and that small shift moves the focus higher up toward the upper traps and rear delts. Two exercises, same basic setup, different parts of the back. Bench at 45 degrees, lie face down, let the dumbbells hang. Row them up with your elbows flaring slightly outward rather than straight back — that outward angle is what redirects the work higher up. Squeeze the upper back hard at the top before lowering. 11. Dumbbell Face Pull Cable machines do face pulls better, no question. But lying face down on an incline bench gets you surprisingly close, and for shoulder health and posture work, this movement is hard to skip — it trains the rear delts and external rotators in a way that almost nothing else on this list does. Bench at 30–45 degrees, face down, light dumbbells hanging. Pull them toward your face with your elbows flaring wide and high — the cue that actually works is thinking about driving your elbows back and out rather than just pulling up. That distinction changes where you feel it completely. This isn't a strength exercise, it's a health exercise — fighting heavy weight here just means your bigger muscles take over and the ones you're trying to train don't do anything. 12. Dumbbell Good Morning Nobody does good mornings anymore, which is a shame because the erectors — the muscles running along either side of your spine — don't get directly trained by much else on this list. They're what keeps your back from folding when things get heavy, and this exercise builds them better than almost anything. Hold a dumbbell at each shoulder or one at your chest, feet hip-width apart. Soft bend in the knees, then hinge at the hips and let your torso drop toward parallel. Spine stays long the whole way down — no rounding. Drive the hips forward to come back up. A lot of people accidentally squat this movement without realizing it. The knees have a slight bend but they shouldn't be going anywhere — once they start tracking forward, the whole exercise changes. Hips travel back, that's the only thing moving. Simple Dumbbell Back Workout Plan for Home Gym Three plans below — pick the one that matches where you are right now. If you're doing full-body workouts rather than dedicated back days, just pull 3–4 exercises from whichever plan fits and rotate through them. Beginner — 2 Days Per Week, Dumbbells Only No bench needed. Just a pair of dumbbells and enough floor space to move freely. Rest 60–90 seconds between sets. Exercise Sets Reps Dumbbell Weight Bent-Over Dumbbell Row 3 10–12 15–25 lbs Romanian Deadlift 3 10–12 20–30 lbs Single-Arm Dumbbell Row 3 10 per side 15–25 lbs Dumbbell Reverse Fly 3 12–15 8–15 lbs Spend the first four weeks just getting the movements right before chasing heavier weights. A good rule of thumb: the last two reps of each set should feel genuinely hard — not impossible, but not easy either. Intermediate — 3 Days Per Week, Dumbbells + Weight Bench A bench opens up the chest-supported row, which is worth adding at this stage — it removes body momentum from the equation and forces your back to do all the work. Rest 90 seconds between sets. Exercise Sets Reps Dumbbell Weight Dumbbell Deadlift 4 6–8 35–50 lbs Chest-Supported Dumbbell Row 4 10–12 20–35 lbs Single-Arm Bench Row 3 10 per side 25–40 lbs Dumbbell Pullover 3 10–12 20–30 lbs Dumbbell Reverse Fly 3 12–15 10–20 lbs Dumbbell Shrug 3 12–15 30–45 lbs Start writing your weights down. The goal from here is small, steady progress — adding 5 lbs every couple of weeks on your main lifts adds up faster than it sounds. Advanced — Pull Day A & B, 2x Per Week At this level, you're training 4 days a week — 2 push days and 2 pull days. This section covers the pull days — which is where your back training happens. Run Pull Day A and Pull Day B on separate days, with at least one rest day in between. Pull Day A Exercise Sets Reps Dumbbell Weight Dumbbell Deadlift 4 5–6 50–70 lbs Chest-Supported Dumbbell Row 4 8–10 30–45 lbs Dumbbell Pullover 3 10–12 25–35 lbs Dumbbell Face Pull 3 15 10–15 lbs Pull Day B Exercise Sets Reps Dumbbell Weight Romanian Deadlift 4 8–10 40–60 lbs Single-Arm Bench Row 4 8 per side 35–50 lbs Incline Dumbbell Row 3 10–12 25–40 lbs Dumbbell Good Morning 3 10–12 20–30 lbs Dumbbell Shrug 3 15 35–50 lbs Keep at least one full rest day between Pull Day A and Pull Day B. Recovery is where the actual progress happens — the training just creates the signal. FAQs 1. What are the best dumbbell back exercises? Honestly, start with the bent-over row and single-arm row and build everything else around those two. They're the ones you can actually load heavy, and the strength carries over. Romanian deadlifts for the lower back, reverse flys if your posture needs work — and if you've got a bench sitting around, the chest-supported row is worth adding. 2. Can you build a back with just dumbbells? Yes. The back grows from tension and consistent effort — not from specific machines. Pick the right exercises, use a weight that's actually challenging, and add weight over time. That's the whole formula, with or without a cable setup. 3. Are 4 exercises enough for the back? More than enough for most people. You don't need a long list — you need the right movements done well. A row, a hinge, and an isolation exercise cover all the major muscles. The beginner plan in this guide uses four exercises and delivers real results for the first several months of training. 4. How to grow back at home with dumbbells? Train 2–3 times a week, use a weight that makes the last couple of reps hard, and slowly increase the load every few weeks. Keep it that simple. Most people who struggle to see back progress are either going too light or not showing up consistently enough — not using the wrong exercises. 5. How to choose the right dumbbells for back training? Go heavier than you think you need to. Back muscles are strong — most beginners can handle 25–35 lbs on rows within a few weeks. A set that goes up to 50 lbs gives you plenty of room to grow through your first year. Our 5–55 lb Urethane Dumbbell Set is a solid option if you want something built to last. Key Takeaway Back training has a way of paying you back in places you didn't expect — your posture, your energy, the way your body handles a long day. It's also more accessible than most people realize, which is kind of the whole point of this guide. Two dumbbells and some floor space cover most of it. A weight bench opens up the rest. From there, it's just reps, consistency, and adding weight when things stop being a challenge. Major Fitness has the essential home gym equipment you need to set up at home — but the work is on you. References 1. Springer Nature Link – Posterior-Chain Resistance Training Compared to General Exercise and Walking Programmes for the Treatment of Chronic Low Back Pain: Systematic review and meta-analysis in Sports Medicine found posterior chain resistance training led to meaningful reductions in pain and disability, supporting deadlifts, Romanian deadlifts, and good mornings as tools for long-term lower back health. 2. Frontiers in Physiology – Effect of Unilateral Training and Bilateral Training on Physical Performance: A Meta-Analysis: Meta-analysis comparing unilateral vs. bilateral resistance training — found unilateral training better addresses strength imbalances between sides, supporting the case for single-arm dumbbell exercises in a balanced back program. 3. American Council on Exercise (ACE) – What Is the Best Back Exercise?: ACE-sponsored EMG research on 8 common back exercises — identified bent-over rows and rowing variations as top choices for mid-trap, infraspinatus, and erector spinae activation, directly supporting the exercise selection in this guide.
Long Bicep vs Short Bicep: What's the Difference and How to Train Each
May 19, 2026

Long Bicep vs Short Bicep: What's the Difference and How to Train Each

Pull up your sleeve right now and flex. That shape you see — whether it peaks dramatically or runs long and flat toward your elbow — was decided before you ever touched a weight. It comes down to one thing: where your bicep muscle ends and the tendon takes over near your elbow. Some people are born with a long muscle belly that fills the arm almost to the crease. Others have a shorter one that leaves a visible gap — but often builds a sharper, higher peak. No exercise changes that gap. What training does change is everything else: size, proportion, and which head is more developed. This guide breaks down how to identify your bicep type and which exercises give you the best results for your specific structure. What Are Bicep Heads? The Anatomy Behind Your Arm Shape Your bicep has two heads, not one — and each one shapes your arm differently. The long head travels down the outside of your arm from the shoulder socket. That's the one creating the peak — the part that pops when you hit a flex in the mirror. The short head takes a slightly different path along the inner arm. Less peak, more mass. It's what makes an arm look thick and full from the front, even when it's just hanging at your side. Both heads matter for how your bicep looks — but there's a third factor that determines your overall arm shape: where their shared tendon attaches near your elbow. How far down that point sits is what separates a "long bicep" from a "short bicep." You can build both heads bigger — but you can't move where they attach. That was decided long before you ever picked up a dumbbell. A cadaveric study published in Folia Morphologica examined 80 upper limbs and identified three distinct insertion types in the biceps brachii tendon — confirming that the distal attachment point of this muscle varies significantly between individuals. In plain terms: the anatomy you're born with directly shapes how your bicep looks, and no amount of training changes that. Long Bicep vs Short Bicep: What's the Real Difference? First, a clarification that trips a lot of people up: "long bicep" and "short bicep" in gym culture doesn't refer to the two heads of the muscle. It refers to the length of the muscle belly itself — how far the meaty part of your bicep extends down toward your elbow before the tendon takes over. Feature Long Bicep Short Bicep Muscle belly Extends close to the elbow crease Ends higher up the arm Gap near elbow Little to none Noticeable gap (2–3+ fingers) Flexed appearance Lower, rounder peak Higher, sharper "mountain" peak Relaxed appearance Full and thick from shoulder to elbow Less full, but more dramatic when developed Best look T-shirt, relaxed poses Stage, front double bicep pose Strength potential Slightly higher (more sarcomeres in series) Slightly lower, but negligible in practice Famous example Ronnie Coleman Arnold Schwarzenegger From a strength perspective, longer muscle bellies do have a theoretical edge — more sarcomeres in series means more contractile units available for growth. But in practice, training age, consistency, and programming matter far more than insertion point. Plenty of elite powerlifters pull enormous weights with short bicep insertions. Long Head Bicep Exercises: Build the Peak You can't change where your bicep inserts. But you can absolutely change how developed the long head is — and that gap near your elbow looks a lot less obvious when there's a thick, peaked muscle sitting above it. The rule is simple: arm behind the body, long head gets worked. 1. Incline Dumbbell Curl Most people set up the adjustable bench to an incline angle and immediately start curling. That's the mistake. The whole value of this exercise is in the starting position — before the first rep even begins. Sit back at 45 degrees and just let your arms hang. Straight down, slightly behind your torso. Feel the pull at the top of your bicep — that's the long head already under a deep stretch, already loaded, before you've done anything. No other curl puts you in that position from the start. From there, the job is simple: don't ruin it. Curl slowly, keep the elbows back and stationary, and squeeze hard at the top. Then take a full three seconds to lower the dumbbells back down. That eccentric phase — the lowering — is where a significant amount of the growth stimulus actually comes from, and most people rush straight through it. The most common way this exercise stops working is when the elbows drift forward as the weight gets heavier. The moment that happens, the long head disengages, and you've turned a highly specific exercise into a mediocre standing curl on an uncomfortable bench. If you can't keep the elbows back, the weight is too heavy. 2. Barbell Curl (Narrow Grip) Nobody talks about grip width and it's one of the biggest missed variables in arm training. Slide your hands just inside shoulder width on the barbell — not close-grip, just narrower than you normally hold it — and you've externally rotated the humerus enough to shift a meaningful amount of tension onto the long head. Same exercise, different stimulus. Go heavy here. Not sloppy heavy, but genuinely challenging. This is the one bicep movement where loading up makes real sense. Pin your elbows, curl to chin height, pause at the top like you mean it, and lower slowly. If your lower back is rocking, the weight is too heavy — strip a weight plate and do it right. 3. Cable Curl (Arms Behind Body) Here's something most people never notice: grab a dumbbell, curl it to the top, and hold it there. It feels almost weightless. That's not your bicep getting stronger mid-set — that's physics. At full contraction, gravity is pulling nearly parallel to your forearm, which means the resistance has basically disappeared right at the moment your muscle is fully shortened. That's the fundamental problem with free weights on curls, and cables solve it completely. The pulley changes the direction of resistance so tension stays loaded through the entire arc — bottom, middle, and top. When you squeeze at the peak of a cable curl, your bicep is actually working against something. That contraction means something. Set the cable handle attachment to a low pulley, step forward until your arms are slightly behind the cable's line of pull, and curl. Keep the elbows behind your torso throughout. The step forward is the detail most people skip — without it, your arms are in front of the body and you've lost the long head emphasis entirely. 4. Hammer Curl Most people treat hammer curls as a forearm exercise and move on. They're leaving a lot on the table. The neutral grip recruits the long head differently than a supinated curl, but the real prize is the brachialis — a flat, dense muscle that sits underneath the bicep belly. You can't see it directly, but when it grows, it pushes the bicep up from below. A well-developed brachialis on someone with short insertions can make a dramatic difference in how peaked the arm looks. Palms in, no wrist rotation, controlled rep from bottom to top. Nothing fancy. Just do them consistently and actually load them progressively over time. Short Head Bicep Exercises: Build Thickness and Fullness If the long head rule is "arm behind the body," the short head rule is the opposite: arm in front, or grip wide. Both positions reduce long head involvement and force the short head to carry the load. This is what builds the inner thickness that makes an arm look full from the front — not just peaked from the side. 1. Preacher Curl There's a reason preacher curl is the first exercise every serious arm trainer goes to for short head work. The pad locks your upper arms in front of your torso before the rep even starts — the long head is already shortened, already taken out of the equation. What's left is mostly short head, doing all the work with nowhere to hide. Use an EZ bar to save your wrists, or dumbbells if one arm tends to lag behind the other. Lower slowly until your arms are nearly straight — not hyperextended, just fully stretched — then curl back up without letting your arms leave the pad. The descent is where most bicep tears happen, and almost all of them happen because someone let the weight drop. Don't be that person. 2. Concentration Curl Arnold made concentration curls a staple of every arm session and called them "the secret to peak biceps development" — his words, not gym folklore. What he understood — and what most people miss — is that bracing the elbow against the inner thigh isn't just about stability. Your elbow is braced, your arm is slightly forward, and suddenly the long head has nowhere to contribute. The short head takes over — and at the top of the movement, it's fully contracted with no way to bail out. Sit forward on a bench, brace your elbow against your inner thigh, and let the dumbbell hang toward the floor. Curl up slowly and rotate the wrist slightly outward at the top — that supination at peak contraction is what creates the squeeze Arnold was after. Hold it for a full second before lowering. Don't rush this one. 3. Wide-Grip Barbell Curl This is the same barbell curl you already do, with one change that most people have never tried: slide your hands out 4–6 inches wider than shoulder width. Sounds too simple to matter. It isn't. Going wider changes how the humerus sits in the joint, and that shift quietly moves tension from the outer bicep to the inner — without you changing anything else about the movement. Keep your elbows tucked, curl with control, and actually try to feel the inner bicep working rather than just moving the weight from A to B. If you can't feel the difference between this and a narrow-grip curl, you're probably going too heavy. 4. Spider Curl Think of this as a preacher curl with the pad flipped. Lying chest-down on a 45-degree incline bench puts your arms hanging straight in front of your body — there's no way to recruit the long head, no way to use your back, no way to cheat. Just the short head, working through a full range of motion with gravity pulling straight down against it the entire time. Let your arms hang off the front edge of the bench, curl up toward your chin, and lower fully on every rep. The stretch at the bottom is the point — don't cut it short. This is one of those exercises that feels almost too simple until you've done it strictly for a few sets and realize why people keep coming back to it. Can You Change Your Bicep Shape Through Training? Short answer: no. Your insertion point is genetic, and it's not moving. But that's not actually the problem most people think it is. Here's what does change with training — and it matters more than the insertion point ever could. The most obvious one is size. A short insertion on a 13-inch arm looks like a gap. That same insertion on a 17-inch arm looks like a peak. Nothing about the anatomy changed — the muscle around it just got bigger. That alone is reason enough to stop worrying about your genetics and start worrying about your programming. The brachialis is another variable most people leave untrained. It sits underneath the bicep belly — you can't see it directly — but when it develops, it physically pushes the bicep upward. Hammer curls, neutral-grip work, reverse curls: these are brachialis exercises first. Train them consistently, and the peak you already have starts looking higher without anything about your genetics changing. Body fat is the one nobody wants to talk about. A lot of people who think they have flat, shapeless arms are just carrying enough body fat to blur everything together. Lean out, and the shape that was always there starts showing up. Genetics didn't change — visibility did. Finally, head balance. If you've been curling the same way for years, one head is probably more developed than the other. The long head and short head respond to different positions and grips. Target whichever one is lagging, and the overall shape of the muscle shifts in ways that feel almost like changing your genetics — even though you're not.Your insertion point is where you start. It's not where you finish. FAQs 1. Is it better to have a short or long bicep? Neither, honestly. It comes down to what you want your arms to look like. Short insertions give you that sharp, high peak when you flex. Long insertions fill the arm out more — thick from every angle, not just in a pose. Arnold had short. Ronnie had long. Both are considered the greatest of all time. That should answer the question. 2. How can I tell if I have short or long biceps? Flex hard and look at the gap between where your bicep muscle ends and your elbow crease. Three fingers or more in that space? Short insertion. One finger or less? Long. Most people land somewhere in the middle. Takes about five seconds to figure out. 3. Do short biceps look bigger? In a flex, yes — the peak pops more. But walk around with your arms relaxed and long biceps usually look more developed. Stage lighting and posed photos favor short insertions. Everything else tends to favor long ones. 4. Do long biceps have more potential? More muscle fibers means more room to grow, so technically yes. But honestly, the difference between insertion types is tiny compared to the difference between someone who trains consistently for five years and someone who doesn't. Genetics gives you a range. Training decides where in that range you land. 5. Is a short bicep weaker? In the real world, no. There's a biomechanical argument on paper, but it doesn't show up in actual training results. Some of the biggest pullers in powerlifting history had short bicep insertions. Hard training beats insertion type every time. Conclusion Long bicep or short bicep — at the end of the day, it's just the hand you were dealt. It shapes how your arm looks at baseline, and that's about as far as its influence goes. Everything after that is training. If you're short, run the peak exercises — concentration curls, spider curls, preacher curls. If you're long, the goal is thickness — heavy barbell curls, hammer curls, brachialis work. Arnold spent decades on concentration curls. Ronnie spent decades under a loaded barbell. Different arms, different priorities, same outcome. All you need is the right setup to get started. Whether that's an adjustable bench for incline curls, a cable system for constant tension work, or a barbell for heavy compound loading, Major Fitness has the home gym equipment to run every exercise in this guide without leaving your house. References 1. Folia Morphologica – Anatomical Variations of the Biceps Brachii Insertion: A Proposal for a New Classification: Cadaveric study examining 80 upper limbs that identified three distinct insertion types in the biceps brachii tendon — confirming that the distal attachment point varies significantly between individuals, forming the anatomical basis for long vs. short bicep differences. 2. Journal of Sports Science & Medicine – Effect of the Shoulder Position on the Biceps Brachii EMG in Different Dumbbell Curls: EMG study comparing incline dumbbell curl, preacher curl, and standard biceps curl — found that incline and standard curls produced consistent biceps activation throughout the full range of motion, while the preacher curl showed high activation only at the beginning of the concentric phase. 3. PMC / Journal of Human Kinetics – Differences in Electromyographic Activity of Biceps Brachii and Brachioradialis While Performing Three Variants of Curl: EMG analysis of dumbbell, straight barbell, and EZ-bar curl variants — confirmed that incline curls pre-stretch the biceps long head, and hammer curls enhance brachialis involvement, supporting the exercise selection rationale in this article.